The ESP8266 is a small microcontroller chip with integrated wifi that is really interesting for wifi connected applications for The Internet of Things. This chip can be programmed with the Arduino IDE, just like regular arduino's and its clones. Very good documentation about it can be find in the official esp8266 Arduino docs.
There are various boards that use this chip. The ESP-01 boards only have 8 pins, are very small and cheap and are great for one sensor or device to control in a small form-factor. There are also larger boards like the NodeMCU, WeMOS and Adafruit HUZZAH that have additional features, are often easier to work with but also more expensive and larger. And many of those boards also have cheap Chinese copies, some of which are identical to the more official ones, while others have reliability issues. The my2cents blog has a great articles comparing the different boards.
This documentation is used during the workshops/course The Internet of Things - Building your own Smart Farm. You can find presentations and other course information on that page.
Getting Started with Arduino and the ESP8266
To get started with programming a nodemcu or esp-01 with arduino you need to install the following software:
- Download and install the latest arduino IDE for your platform from the Arduino website. Don't use the online IDE, but download the regular windows/linux/mac osx installer.
- Once installed, start the Arduino IDE
- Got to File->Preferences
- In the field "Additional Boards Manager URLs" add the following url: http://arduino.esp8266.com/stable/package_esp8266com_index.json and click ok.
- Then go to Tools->Board->Boards Manager
- Search for ESP8266, click and install the latest version for it and close when it's finished.
- If you are running windows, also install the CP210X drivers for your version of windows.
You are now almost ready to start with programming. You only need to select the right settings depending on which board you have:
NodeMCU
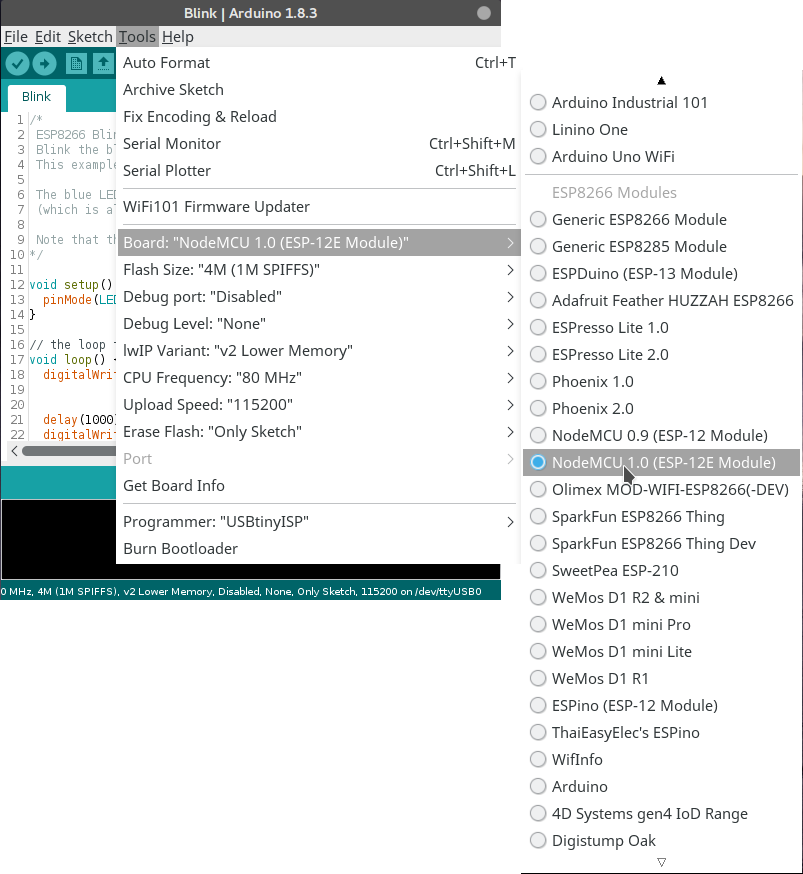
- Under Tools->Board, select the NodeMCU 1.0
- All other settings can be left at their default values.
- Connect the NodeMCU with a micro-usb cable to your computer.
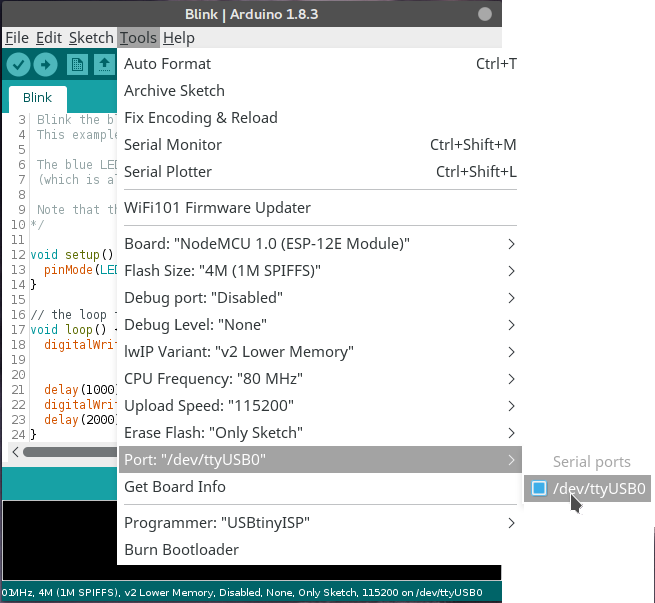
- Under Tools->Port you can now see one USB serial port. This will be your NodeMCU. Select it.
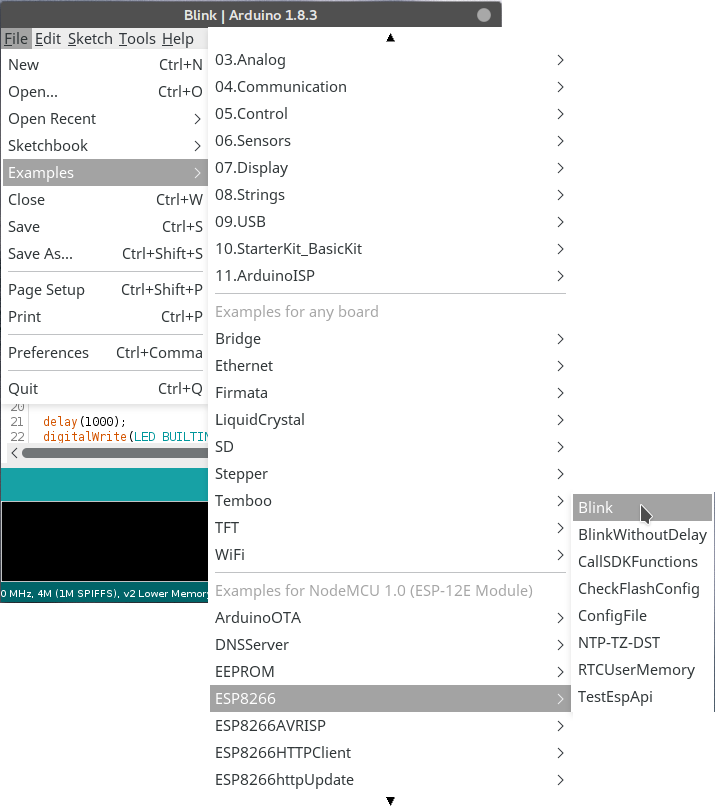
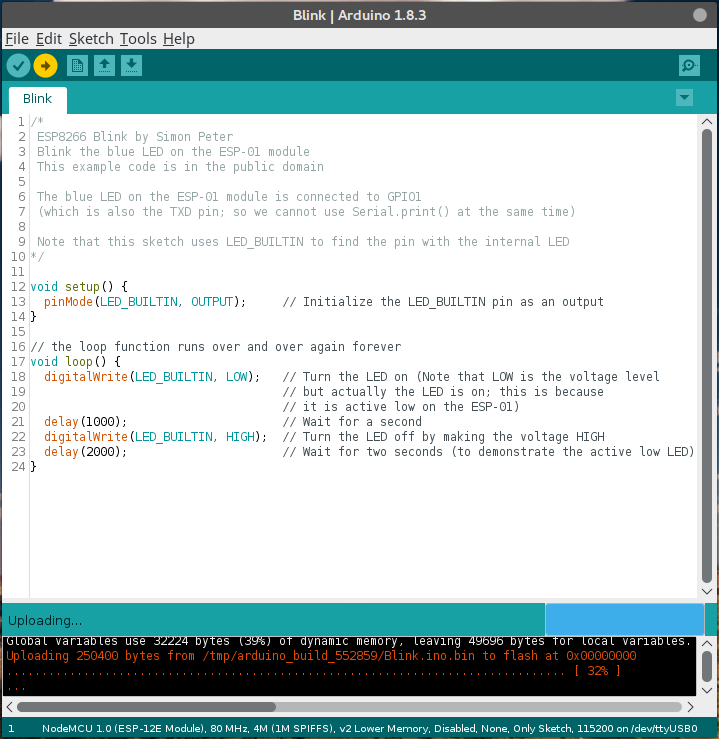
- Start with a simple LED blink program under File->Examples->ESP8266 (scroll down)->Blink.
- Just upload this program to the NodeMCU and after it is done, it should start blinking it's built-in LED.
Small ESP-01
- Under Tools->Board, select the "Generic ESP8266 Module"
- Most settings will be ok by default, except for the flash size. This depends on the exact board that you have.
- If you have the black ESP-01 from Foundation University, select 1M (no SPIFFS) under Tools->Flash Size. If you know that you need SPIFFS (if you don't know what it is, you don't need it) you can also select one of the other 1M options with a different SPIFFS size.
- All other settings are correct by default.
- Because the ESP-01 does not have a USB port, you need some other devices to connect it to your computer. There are various options to do this.
The simplest is to use a the Geekreit ESP8266 Serial to USB programmer that can be found cheaply on bangood or lazada. If you buy one, do realize you need to solder an additional jumper between two pins. For more info on this see this Codekrypt blogpost. The ones FU has already contain this jumper.
Another option is to use a regular FTDI friend, FTDI cables and similar Serial UART to USB converters that people might already have for other microcontrollers. This will be a bit more difficult and you need to make sure you use a 3.3V logic level, not 5V which may be the default for many of those converters. Martyn Currey has a great blogpost with wiring examples on how to do this. - Ones you have your esp8266 connected to your usb port, you can find it under Tools->Port. There is likely only one option there. Select it. Now you can program your ESP-01.
Uploading your first program
See the screenshots below for more detail, click the images for the larger version.
- To upload your first program, use the example blink sketch. You can open it under File->Examples->ESP8266->Blink. This program will blink the internal LED of the NodeMCU or ESP01.
- Under Tools->Board set the Board to the NodeMCU 1.0 (or if you use the small ESP-01, select the Generic ESP8266).
- Under Tools -> Port select the right port. Usually there is only one port listed, under windows this is called COM1, COM2, COM3 etc. Under linux and Mac it is probably called /dev/ttyyUSB0, /dev/ttyUSB1, etc. Just try which one works.
- Now press the upload button. In the bottom black panel you will see that it is first compiling the code, and then uploading. When it's uploading, the blue LED on the NodeMCU blinks rapidly. You will also see the progress in the black bar. Once it's done, the program that you just uploaded, will start. If you used the example sketch, the LED will be blinking on and off with a 1 and 2 second delay.
Sensor and communication libraries
Arduino comes with a host of built-in functions and objects, but even more user contributed libraries. Companies like Adafruit and Sparkfun that make sensor boards and other devices that you can use with your esp8266, also provide libraries for arduino so you can easily use their devices with any arduino based project (including the ESP8266 ones). THey often also come with examples for those libraries that show you how to use them.
To install libraries, go to Sketch->Include Library->Manage Libraries. Here you can search and install additional libraries. A good set of libraries to install is the following:
- PubSubClient (this is used for MQTT communication)
- Several sensors from Adafruit: the BMP085 Unified, BME280, BME680, HTU21DF, ADS1X15, TSL2561
- OneWire
- DallasTemperature
- Several sensor libraries from Sparkfun: APDS9660 (RGB and Gesture sensor), ISL29125 (RGB sensor)
- IRremote ESP8266
Ones these libraries are installed, you can find examples under File->Examples.