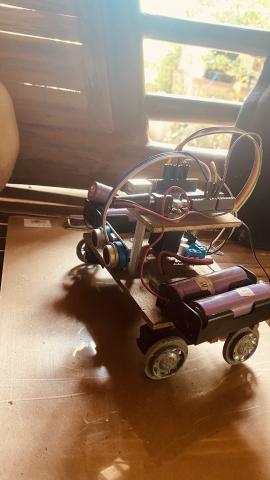
A simple AI for navigation. AI is now everywhere, well almost everywhere. Ever since chatGPT is making a lot of noise in the internet, I’ve been wandering if I could implement AI on an Arduino UNO. So I’ve made some digging, searching for information to understand how AI work, how to create my own AI. Read tons of articles about it, even found an article that made feel I finally made my own AI (for a while). But then I realized, I didn’t create that. I just downloaded a bunch of file, tweaked a few parameters to much my needs compiled it and it’s done. An AI on my laptop, but it’s not mine.
Then, I found an article with a link to youtube that deeply explains what makes AI tick. The video is so informative, deeply explains how each neurons triggers an event. So, I tried to understand the logic behind the codes. That’s when I decided to finally try to implement it on an Arduino UNO. But then it hits me, this is huge. It won’t fit, the codes alone takes up so much memory.
And so, I made some thinking maybe I can make a simple AI that it’s only function is to navigate flat surface with only few obstacles. And now here we are. A little disclaimer “I won’t be posting the whole code, only the very basic like collecting of sensor values, filtering the relevant values, the basic movement (forward, turn right or left, reverse), but the actual AI Algorithm, I’ll just replace it with if-else control structure.
here it is:
#define TRIG_PIN 12
#define ECHO_PIN 11
#define LEFT_MOTOR1 4
#define LEFT_MOTOR2 5
#define RIGHT_MOTOR1 6
#define RIGHT_MOTOR2 7
#define NUM_SAMPLES 50
int distances[NUM_SAMPLES];
void setup() {
Serial.begin(9600);
pinMode(TRIG_PIN, OUTPUT);
pinMode(ECHO_PIN, INPUT);
pinMode(LEFT_MOTOR1, OUTPUT);
pinMode(LEFT_MOTOR2, OUTPUT);
pinMode(RIGHT_MOTOR1, OUTPUT);
pinMode(RIGHT_MOTOR2, OUTPUT);
}
void loop() {
for(int i=0; i<NUM_SAMPLES; i++) {
digitalWrite(TRIG_PIN, LOW);
delayMicroseconds(2);
digitalWrite(TRIG_PIN, HIGH);
delayMicroseconds(10);
digitalWrite(TRIG_PIN, LOW);
long duration = pulseIn(ECHO_PIN, HIGH);
distances[i] = duration/58;
}
// Signal processing
int peaks[3];
peaks[0] = getPeak(distances, NUM_SAMPLES, 1);
peaks[1] = getPeak(distances, NUM_SAMPLES, 2);
peaks[2] = getPeak(distances, NUM_SAMPLES, 3);
Serial.print("Object 1: ");
Serial.print(peaks[0]);
Serial.print(" Object 2: ");
Serial.println(peaks[1]);
Serial.print(" Object 3: ");
Serial.println(peaks[2]);
if(peaks[0] > THRESHOLD){
//Move forward
}else if(peaks[1] > peaks[0]){
//Turn towards peaks[1]
}else if(peaks[2] > peaks[0]){
//Turn towards peaks[2]
}else{
//Move backwards
}
}
int getPeak(int values[], int num, int peakNum){
// Bubble sort algorithm
for(int i=0; i<num-1; i++){
for(int j=0; j<num-i-1; j++){
if(values[j] < values[j+1]){
int temp = values[j];
values[j] = values[j+1];
values[j+1] = temp;
}
}
}
// Return requested peak
return values[peakNum-1];
}
void moveForward(){
digitalWrite(LEFT_MOTOR1, HIGH);
digitalWrite(LEFT_MOTOR2, LOW);
digitalWrite(RIGHT_MOTOR1, HIGH);
digitalWrite(RIGHT_MOTOR2, LOW);
}
void turnRight(){
digitalWrite(LEFT_MOTOR1, HIGH);
digitalWrite(LEFT_MOTOR2, LOW);
digitalWrite(RIGHT_MOTOR1, LOW);
digitalWrite(RIGHT_MOTOR2, HIGH);
}
void turnLeft(){
digitalWrite(LEFT_MOTOR1, LOW);
digitalWrite(LEFT_MOTOR2, HIGH);
digitalWrite(RIGHT_MOTOR1, HIGH);
digitalWrite(RIGHT_MOTOR2, LOW);
}
void moveBackward(){
digitalWrite(LEFT_MOTOR1, LOW);
digitalWrite(LEFT_MOTOR2, HIGH);
digitalWrite(RIGHT_MOTOR1, LOW);
digitalWrite(RIGHT_MOTOR2, HIGH);
}
If want to create your own simple AI, just follow the algorithm below. Feel free to tweak it to suit your needs.
An AI algorithm to accomplish simple task using a microcontroller:
1. Define the inputs and outputs as variables:
- Inputs: int input1, input2, input3
- Outputs: String output1 = "moveForward", "reverse", etc.
2. Initialize weights and biases arrays:
- float weights[3]
- float biases
3. Process the inputs multiplying by the weights, then add the biases:
- float result = input1 * weights[0] + input2 * weights[1] + input3 * weights[2] + biases
4. Use an if/else statement to select the output based on the result:
- if(result > 1.0) output = "moveForward";
- else if(result < -1.0) output = "reverse";
- etc.
5. Attempt to move using the selected output.
6. Check if movement was successful:
- if(movementSucceeded()) continue;
- else updateWeightsAndBiases();
7. The updateWeightsAndBiases() function would reassign random new values to the weights and biases arrays to try a different combination on the next iteration.
8. Repeat steps 3-7 in a loop to continuously process inputs and refine the weights and biases over time until successful movement is achieved.
Microcontrollers like Arduino are well-suited for implementing basic neural network algorithms like this.